8 Ways to Boost Your Website Performance

In today's world, people expect websites to load quickly. If your website is slow, users will be frustrated and may even leave before the page finishes loading. Not only is this bad for the user experience, but it can also negatively impact your bottom line. According to studies by Amazon and Google, a one-second delay in mobile page load times can impact conversion rates by up to 20%. Therefore, optimizing your website's performance is crucial to provide a better user experience and potentially increasing revenue.
One tool that can help you measure your website's performance is Lighthouse. Lighthouse is an open-source, automated tool that Google created to help website developers improve the quality of web pages. Lighthouse measures several aspects of website performance, including page load times, accessibility, and SEO.
Improving website performance involves key steps: measure, change, measure, and compare. First, measure your website's performance using tools like Lighthouse or other performance monitoring software. Then, make changes to your website to improve its performance. After making these changes, measure your website's performance again to see if there is any improvement. Finally, compare your before and after measurements to determine if your changes have positively impacted your website's performance.
Lighthouse is a powerful tool for measuring website performance. It generates a report that provides insight into several aspects of website performance, including page load times, accessibility, SEO, and more.
Here are some of the measurements that Lighthouse takes and what they mean:
- First Contentful Paint (FCP): This measures how long it takes for the first piece of content to appear on the screen. This is an important metric because it gives users an idea of how long they will have to wait before seeing any content on the page.
- Largest Contentful Paint (LCP): This measures how long it takes for the most important content to appear on the screen. This metric is important because it gives users an idea of when they can start interacting with the page.
- Time to Interactive (TTI): This measures how long it takes for a page to become interactive. This is the point at which the user can start interacting with the page and perform actions such as clicking buttons or scrolling.
- Total Blocking Time (TBT): This measures how long the main thread is blocked from responding to user input. This is an important metric because it can impact the user experience and frustrate users if they cannot interact with the page.
To generate a Lighthouse report for performance, follow these steps:
- Open the website that you want to test in Google Chrome.
- Open the Chrome Developer Tools by pressing F12 or right-clicking on the page and selecting "Inspect."
- Click on the "Lighthouse" tab in the Developer Tools.
- Click on the "Generate report" button.
- Lighthouse will run a series of tests and generate a report that provides insight into your website's performance.
- Review the report and identify areas where your website can be improved.
Using Lighthouse to measure your website's performance, you can identify areas where your website is performing poorly and make changes to improve the user experience.
While Lighthouse is a valuable tool for measuring website performance, measuring real-world user data is also essential. You can do this using the Web Vitals package or the Performance JavaScript API. These tools can give you insight into how your website performs for real users, which can help you prioritize improvements that will impact the user experience.
import { getCLS, getFID, getLCP } from 'web-vitals'

function sendToAnalytics(metric) {
  // Send the metric data to your analytics platform
  console.log(metric);
}

getCLS(sendToAnalytics)
getFID(sendToAnalytics)
getLCP(sendToAnalytics)
In this example, we use the getCLS, getFID, and getLCP functions from the web-vitals package to measure Core Web Vitals. These functions take a callback
function as a parameter, which will be called with the metric data once the metrics have been calculated.
Reduce the amount of JavaScript and remove dead code.
Excessive and redundant JavaScript can slow down the loading time of your website. Therefore, it's essential to reduce the amount of JavaScript and remove any dead code. One way to do this is using the Webpack Bundle Analyzer, which can help you analyze your bundle size and identify unnecessary code.
Install Webpack Bundle Analyzer as a development dependency:
yarn add --dev webpack-bundle-analyzer
Add a new script to your package.json file to run Webpack Bundle Analyzer:
{
  "scripts": {
    "analyze": "webpack-bundle-analyzer dist/bundle.js"
  }
}
In this example, we're telling Webpack Bundle Analyzer to analyze the dist/bundle.js file.
Run the script with Yarn:
yarn analyze
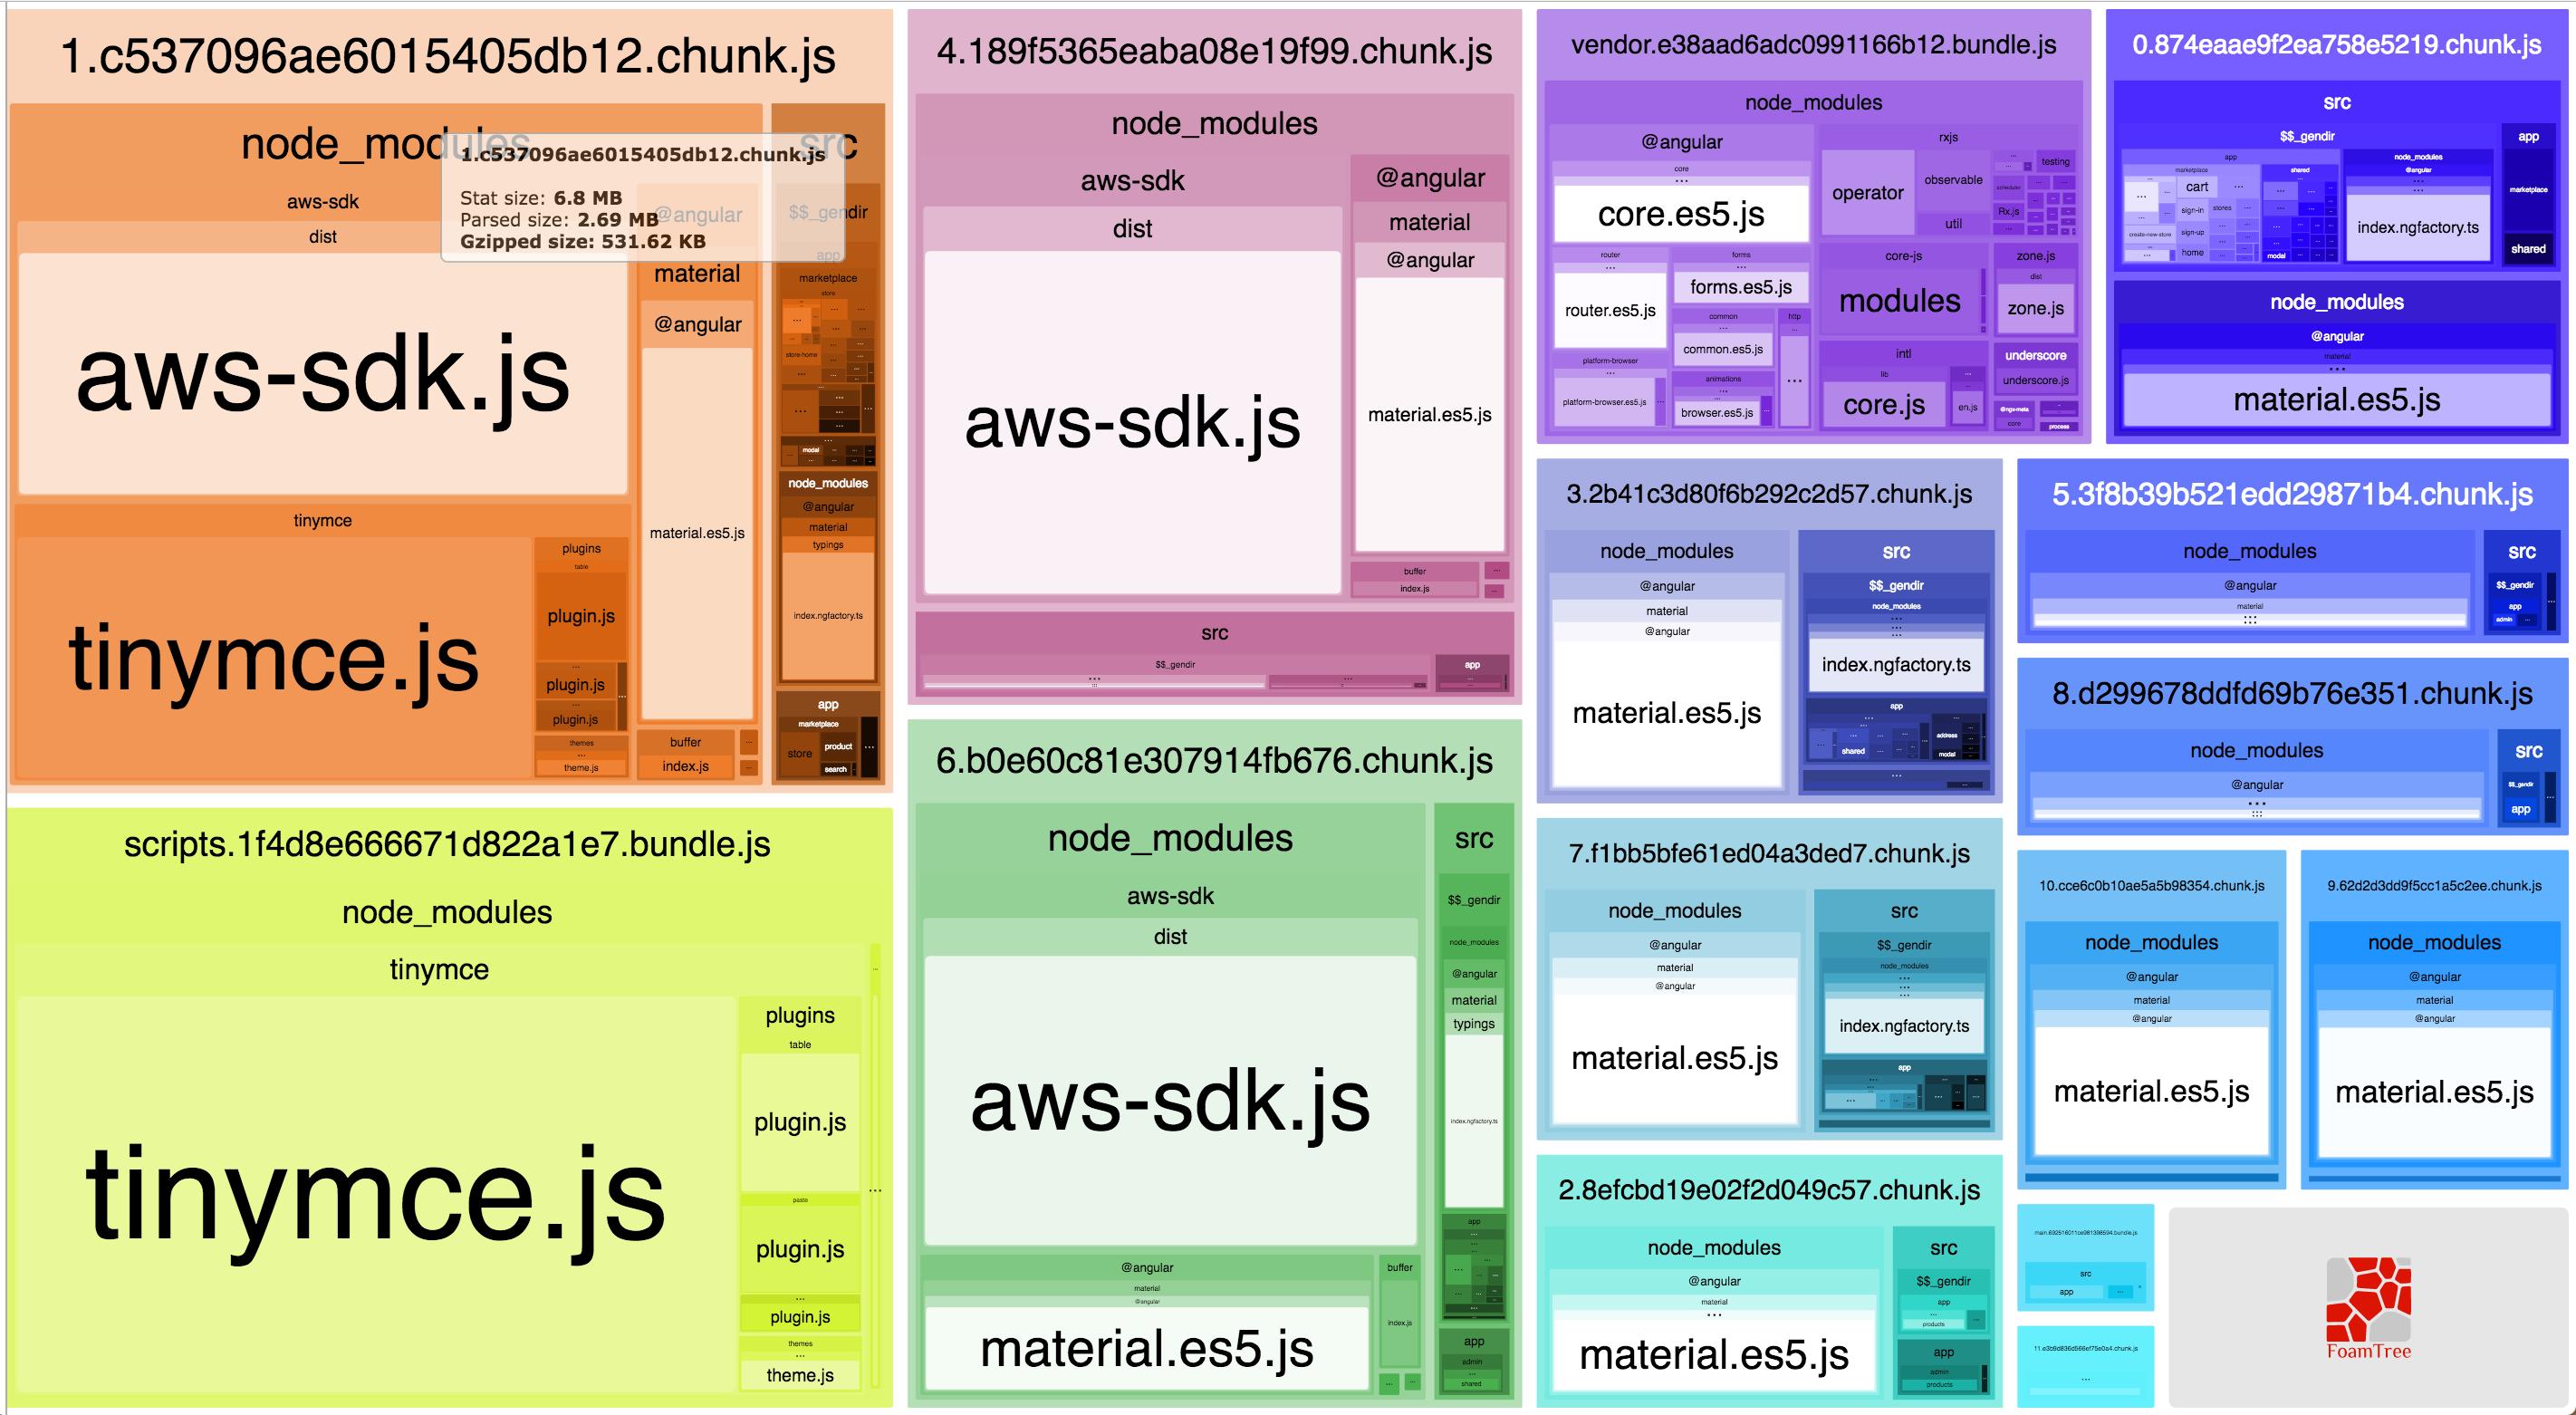
This command will open a new tab in your browser with a visual representation of your Webpack bundle, showing the size of each module and identifying any potential issues.
Using Webpack Bundle Analyzer, you can identify and remove any unnecessary code from your JavaScript bundle, reducing its size and improving your website's performance.
Lazy load of offscreen images
Loading all web page images simultaneously can slow the page's initial load time. Therefore, it's recommended to use lazy loading for offscreen images, which will load images only when they are needed.
One way to do this is by using the loading="lazy" attribute in the image tag.
Here's an example of how to use the loading="lazy" attribute:
<img
  alt="Example image"
  loading="lazy"
  src="image.jpg"
/>
Split your bundle into chunks and lazy load them.
Splitting your bundle into smaller chunks can significantly improve your website's loading time. One way to do this is by using dynamic imports with Webpack. By splitting your app into chunks, parts of your app can be lazily loaded instead of it all being loaded at page load.
Here's an example of how to use dynamic imports with React:
import React, { lazy, Suspense } from 'react'

const LazyComponent = lazy(() => import('./LazyComponent'))

function App() {
  return (
    <div>
      <Suspense fallback={<div>Loading...</div>}>
        <LazyComponent />
      </Suspense>
    </div>
  )
}

export default App
In this example, we use React.lazy() to lazy load a component when needed. We're also using the <Suspense> component to display a loading indicator
while the component is being loaded.
Serve your JavaScript faster using a CDN and GZIP/Brotli Compression.
Serving your JavaScript from a CDN can significantly improve your website's performance by reducing the load on your server. Compressing your JavaScript with GZIP or Brotli Compression can reduce the file size, improving the website's loading time.
Here's an example of how to use GZIP compression with Express.js:
import express from 'express'
import compression from 'compression'

const app = express()

app.use(compression())
Using GZIP compression with Express.js, we're compressing and serving our JavaScript files to the client. GZIP will significantly improve our website's performance by reducing the file size and load time.
Transpiling to ES5 and Modern Javascript
Transpiling your JavaScript code to ES5 can significantly improve your website's performance by ensuring your code is compatible with older browsers. However, modern browsers support newer JavaScript features, which can execute faster.
One way to optimize your website's performance for modern browsers is to transpile your code to ES5 and modern JavaScript and serve them in separate files.
You can use the nomodule attribute on the <script> tag to load the ES5 version for older browsers, while modern browsers can load the
modern JavaScript version.
Here's an example of how to create two separate bundles with Webpack for ES5 and modern JavaScript:
const path = require('path')

const commonConfig = {
  // common configuration for both ES5 and modern JavaScript bundles
}

const es5Config = {
  ...commonConfig,
  output: {
    path: path.resolve(__dirname, 'dist'),
    filename: 'es5.js'
  },
  module: {
    rules: [
      // rules for transpiling to ES5
    ]
  }
}

const modernConfig = {
  ...commonConfig,
  output: {
    path: path.resolve(__dirname, 'dist'),
    filename: 'modern.js'
  },
  module: {
    rules: [
      // rules for modern JavaScript
    ]
  }
}

module.exports = [es5Config, modernConfig];
In this example, we use two separate Webpack configurations to create different bundles for ES5 and modern JavaScript bundles.
<!-- Load the modern bundle for supporting browsers -->
<script type="module" src="modern-bundle.js"></script>

<!-- Load the legacy bundle for non-supporting browsers -->
<script nomodule src="legacy-bundle.js"></script>
In this example, the modern-bundle.js file contains modern JavaScript code optimized for supporting browsers, while the legacy-bundle.js file contains transpiled ES5 JavaScript code optimized for non-supporting browsers.
The type="module" attribute on the first script tag tells the browser that this script contains modern JavaScript code and should only
be loaded by supporting browsers.
The nomodule attribute on the second script tag tells the browser that non-supporting browsers should only load this script. By loading
two different JavaScript bundles, you can ensure your website is optimized for all users, regardless of their browser or device.
Schedule JavaScript
Running JavaScript code at the right time can significantly improve your website's performance. JavaScript is, in most cases, single-threaded, and when a user enters your site, a lot of initial Javascript needs executing before the browser can respond to user input.
The requestIdleCallback() function can schedule JavaScript code to run when the browser is idle, preventing it from blocking other critical tasks.
Here's an example of how to use the requestIdleCallback() function:
window.requestIdleCallback(() => {
  // Run JavaScript code here
})
Prefetching resources
Prefetching resources can significantly improve your website's performance by fetching critical resources beforehand, reducing the time needed to fetch them later when needed.
Here's an example of how to prefetch a font using the <link> tag:
<link rel="preload" href="font.woff2" as="font" type="font/woff2" crossorigin />
We use the rel="preload" attribute to prefetch a font in this example.
We're also using the as="font" attribute to indicate that this resource is a font and the type="font/woff2" attribute to specify the font type.
When a font is prefetched, the browser downloads it in advance, allowing it to be immediately available when it's required. By prefetching resources like fonts, you can reduce the time it takes for the browser to load them, improving the website's loading speed and overall performance. This can have a positive impact on the user experience, as users can quickly access the content they need without having to wait for fonts to load. Overall, prefetching resources like fonts can significantly enhance website performance, providing a faster and more responsive user experience.
Reduce the number of DOM nodes.
Reducing the number of DOM nodes on a webpage can significantly improve the website's loading time. You can achieve this by optimizing the HTML and CSS.
One way to do this is by removing unnecessary elements and using CSS to style elements instead of adding additional elements.
These tips can significantly improve your website's performance by reducing the loading time and optimizing the code. Using these techniques, you can create a fast and responsive website with an excellent user experience.
Optimizing website performance is crucial for providing a better user experience and improving your website's search engine ranking. Implementing the tips discussed in this article can significantly enhance your website's loading speed and make it more responsive.
However, optimizing website performance is an ongoing process, and you should continuously monitor and optimize your website to maintain its performance. By measuring real-world user data, using tools like Lighthouse, and following best practices, you can create a fast and responsive website with an excellent user experience.
Nobody deserves a loading spinner. 🚀